Today I wanted to share our Pixi brush collection with you
 The following is a masterclass on how to use each brush and how to keep them in optimum condition!
  Photo courtesy of BlushingNoir's review: http://bit.ly/1Ey9upe
Find the Pixi brush collection at: http://bit.ly/1lAuJBO
FULL-COVER FOUNDATION BRUSH
 Full-Cover Foundation Brush will be available on pixibeauty.com & in Target stores soon!
I'm so excited to give you a sneak peek of our new must-have face brush!
The Full-Cover Foundation Brush is truly multi-use and can be used to blend anything from liquid foundation to loose setting powder or even any harsh edges of eye shadow. The dense bristles buff-blend perfectly and the precision brush head means that it can fit into small places like the side of the nose and under eye for a seamless canvas!
CHEEK BRUSH & CREAM BASE BRUSH
 Find Cheek Brush at: http://bit.ly/1Ey9Zj3
Find Cream Base Brush at: http://bit.ly/1L417pV
The Cheek Brush is great for any powder formulas - the large fluffy brush head distributes a fine veil of product and blends it effortlessly onto skin.
Love liquid, cream and gel formulas? You'll love the Cream Base Brush! Its slim, firm shape helps to press non-powder foundation, concealer, and blush formulas into skin for the most realistic, skin-like finish.
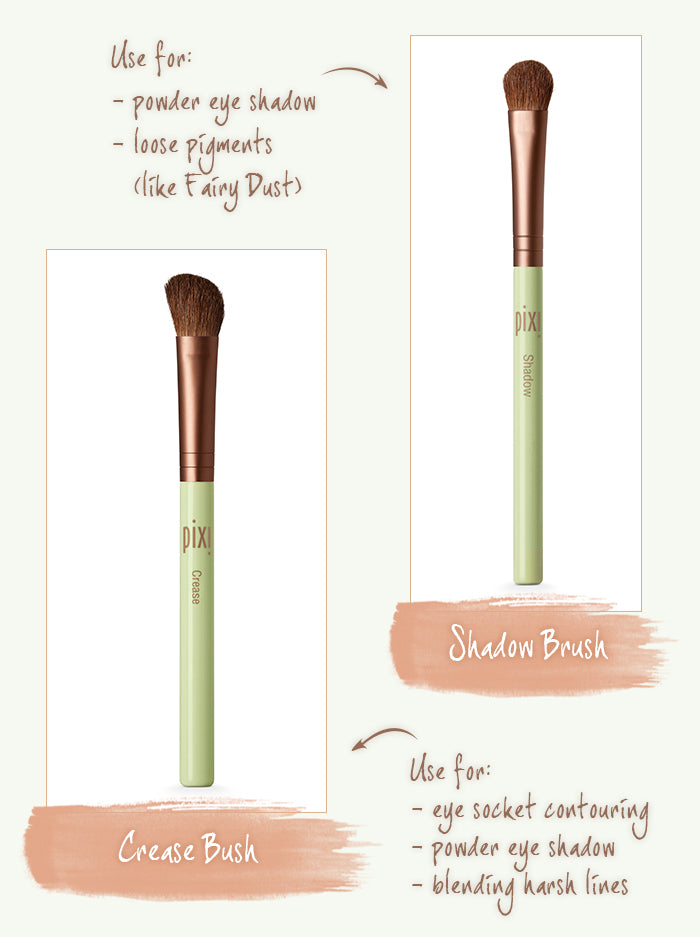
SHADOW BRUSH & CREASE BRUSH
 Find Shadow Brush at: http://bit.ly/1uofaw5
Find Crease Brush at: http://bit.ly/1JeE0a9
For a simple wash of eyeshadow, try the Shadow Brush - it fits perfectly on the eye lid to easily create diffused colour with a buff-blending motion. It's also great for popping a bit of glimmery pigment on the center of the lid for a bright, wide-awake look!
The Crease Brush is great for more dense colour and fits perfectly into the crease of the eye - makes it SO simple to shade and contour the eye. Just use a window-wiping motion in the crease to sculpt your ideal shape!
FLAT LINER BRUSH & CAT LINER BRUSH
 Find Flat Liner Brush at: http://bit.ly/1yUcw8t
Find Cat Liner Brush at: http://bit.ly/1BiGLDR
The Flat Liner Brush is one of my all time favourites! It creates a fine line of gel liner or shadow that defines & frames the eye. The bristles perfectly "hug" the lash line, making lashes look fuller.
Get a retro feline flick with minimal effort with the Cat Liner Brush! It's the perfect tool to create the most precise lines, thanks to its super-slim angled tip. It's also great to highlight - dip into a light shimmery shadow and press into the tear duct area of the eye for a brightened effect!
PRECISION BRUSH, LIP BRUSH, AND LASH & BROW BRUSH
 Find Precision Brush at: http://bit.ly/1yyTJNZ
Find Lip Brush at: http://bit.ly/1L42WDl
Find Lash & Brow Brush at: http://bit.ly/1JeH7im
Smudge and buff to perfection with the Precision Brush - the dense but flat brush head is ideal to work eye shadow or liner into lash line and outward for the easiest smoky eye ever! When used on the lid, this brush lays down pigment for opaque & intense colour.
Our Lip Brush is great not only to sculpt the lip line, but also can be used to apply gel eye liner or concealer! The precision point puts product exactly where you want it.
Lastly, the Lash & Brow Brush is an essential in every makeup kit! It shapes brows & helps to even out colour after filling them in, and also can be used to brush through lashes after mascara application.
HOW TO WASH BRUSHES
In order to keep your brushes in the best shape possible, make sure to wash them often! Follow the steps below:
1. Spray a brush cleanser onto a paper towel or washcloth.
2. Wipe brush head across the towel back and forth until clean.
3. Lay the brush flat to dry – keep the brush head over the edge of a sink or shelf.
If you don’t have a spray brush cleanser, you can use a mild face cleanser or shampoo: dampen brush head, then shampoo and rinse.
Allow approximately eight hours for brushes to dry, depending on the fullness of the brush. Be sure to dry the brushes flat so that moisture will not seep into the ferrule (the metal part that attaches the hair to the brush handle). If moisture gets into the ferrule, the glue will loosen and brush hair will fall out.
Now you're all ready to get out there and be your own makeup artist...have fun!


